
How-to Github Actions: Building your Android App
One of the first things I set up when working on a project, is a Continuous Integration (CI) system.
I’ve recently spent some time migrating several projects of mine to Github Actions. I have to admit that I was amazed by how easy it was to set up, together with the performance boost I gained from it.
In this blog-post series, I will walk you through how to set up your CI with Github Actions. While I migrated real-world projects I collected tips and tricks that will help you get your CI up to speed. This first blog-post will serve as an introduction and will help you to get started with Github Actions. 🚀
What is Github Actions?
Github Actions is a service offered by Github to set up a Continuous Integration (CI) system for your projects hosted on Github. With Github Actions, you can automate tasks of your development lifecycle such as build, test, analyze, bundle, release, and deploy.
Having a good CI is crucial in your development flow.
You can find plenty of material online on how to write good tests, but:
It’s useless to write tests if you are not running them
A CI system allows you to run your tests every time you integrate a change in your codebase. Moreover, builds and tests are running in an isolated environment. This will exclude variability introduced by the local developer machine.
Why Github Actions?
Github Actions is not the only service to set up a CI system. In the past, I used other services such as Travis CI, Circle CI, and GitLab CI.
Yet Github Actions has some pros that made it a better fit for most of my use cases.
Heavily integrated
If you happen to use Github a lot, you will notice that the Actions tab is one click away. Enabling them for your repo is as easy as adding a YAML file.
You don’t have to create any other account anymore and everything is integrated into the Github ecosystem (notifications, PR status, etc.).
When you fork a repository with Actions, you can run builds for your fork out of the box without any setup needed.
Ready for Android
The runners offered by Github Actions allow you to run your build on Linux, Mac, and Windows.
They all have Java and Android already installed and configured (the list of pre-installed software is pretty long).
You don’t have to bother accepting Android Licenses anymore (yes | sdkmanager and permutations of those commands). Workers can build the majority of Android project out of the box without further setup.
Notably Faster
All the projects I migrated saw significant improvements in the build speed. For instance, Chucker build time went from ~6 minutes to less than 3 minutes.
Having a faster CI allows you also to reduce the feedback loop time. You want to get notified as soon as there is a failure in your CI. This is especially crucial in the open-source ecosystem. We definitely don’t want to waste our contributors’ time waiting for a CI status just to report a failure due to wrong formatting.
Why (not) Github Actions?
Github Actions comes with some drawbacks as well that you should take into account when choosing a CI system.
Young ecosystem
Github Actions is generally available as of in November 2019. The ecosystem is vibrant, albeit still pretty young. The open-source community is developing a lot of custom actions that can be shared and reused by other developers. This allows you to “compose” your CI with building blocks provided by the community.
But there are still several features that are missing first-party support:
- Debug via SSH. Currently, you can’t debug a worker via SSH. The workaround is to use a custom action that will open a tmate session for you. Practical, but definitely not secure.
- Manual Approval. Often in a CI system, you have a job to publish an artifact out in the public. Other CI services offer the capability to request a manual approval for specific jobs. With that, you can put a job on hold, verify the result, and either proceed or discard the build. There is no such a feature today in Github Actions (though is in the roadmap for the near future).
Single point of failure
Github is sadly not in great shape recently
The platform suffered several downtimes recently 😕, affecting also Github Actions. Migrating your CI from another service to Github exposes you to such downtimes.
Once Github is down, both your code and your CI will be unavailable. Having your CI on another service will allow you to keep on building even when Github is on fire.

Setting up your CI
Let’s see how to set up Github Actions to build an Android project.
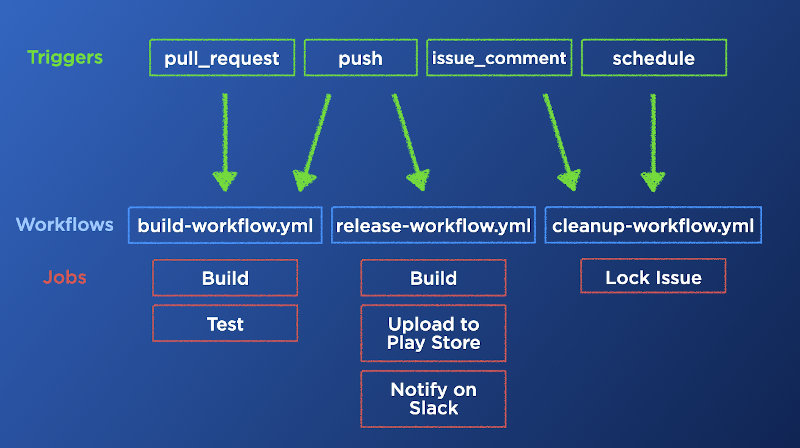
Github Actions is based on three main concepts: workflows, triggers, and jobs.
- A workflow is a custom automated processes that run on your project to achieve a goal, e.g. building the app or releasing a new version to the Play Store,
- A trigger an the event that will cause your process to start running,
- Each workflow can run one or more jobs, either sequentially or in parallel.
This diagram summarizes the relationships between triggers, workflows, and jobs:
- There is a many-to-many relationship between triggers and workflows.
- There is a one-to-many relationship between workflows and jobs.
Let’s have a closer look to each concept.
Workflow
Each workflow lives in a separate workflow file. Workflow files use the YAML syntax and live inside the .github/workflows folder of your repository.
Let’s create our first workflow file .github/workflows/build.yaml and let’s give our workflow a name:
# The name of our workflow
name: Build
Trigger
To run your workflow, you need to define triggers. Usually, you want to run your CI whenever a pull request is opened:
# Trigger on every pull request
on: pull_request
A common practice is also to run the CI after a pull request gets merged. This can be captured with the push trigger, limiting the event to your main branch only:
on:
  # Trigger on every pull request and on push
  # to the `main` branch.
  pull_request:
  push:
    branches:
      - main
You can find all the triggers listed here. Among the others, the one I found most useful are:
scheduleTo schedule a workflow to run at a specific time using thecronsyntax (e.g. daily or weekly)issue_commentTo run a workflow whenever an Issue or a Pull request receives a new comment (e.g. whenever you type the/rebaseor!mergecomment).workflow_dispatchTo run a workflow manually from either the Github UI or from a POST request via the Github API.
Job
Now, you can define a single job inside our workflow that will build the Android project:
jobs:
  build:
    runs-on: ubuntu-latest
    steps:
      - name: Checkout the code
        uses: actions/checkout@v2
      - name: Build the app
        run: ./gradlew build
A job is nothing more than a series of steps that will either run a command or invoke another action. Let’s have a closer look at our job:
jobs:
  build:
    runs-on: ubuntu-latest
This job is called build and will run on a Linux machine. You can specify windows-latest, macos-latest for the runs-on if you’re interested in other runners (they are listed on this page).
Inside steps you can define the list of steps that our job will execute:
steps:
  - name: Checkout the code
    uses: actions/checkout@v2
  - name: Build the App
    run: ./gradlew build
Each step can either invoke another action with uses or execute a shell command with run.
Our steps are trivial: first checkout the repo and then build it. If the job finishes with exit code 0 (i.e. Gradle BUILD SUCCESSFUL) that will make the workflow succeed.
uses: actions/checkout@v2
The uses parameter follow this syntax {owner}/{repo}@{ref}.
This example invokes the actions/checkout, an external action. This step will checkout our repository and will make it available in the working directory for the following steps.
It’s worth noting that this action is a first-party action hence it’s maintained and developed by Github. All the actions inside the actions/ organisation are first party actions.
In this line, you can also specify the version of the checkout action to use: v2.
In general, is a good practice to specify the version used (you can @178c4a or @branchname as well). This will prevent your CI from breaking when the action gets updated by the maintainer.
Finally, it’s time to build the app:
run: ./gradlew build
With the run parameter, you can execute a shell command. In the example, the command is just invoking the Gradle wrapper to run the build task. The build task is a convenience wrapper to invoke both the assemble and check tasks. This will make sure an APK can be built and will run all the tests/verification of my project (both unit tests and static analyzer).
That’s it.
If you add this file inside a repository that contains an Android project and push it, your CI will start running:

You can find the full example in this gist file below:
Conclusions
Github Actions has become my go-to CI solution for Android projects on Github, thanks to its simplicity and its performances. As you saw in this blog-post, you can spin up a CI system for Android with 10 lines of YAML.
In the following blog-posts, we will see some more advanced techniques I’m currently using in CIs for real-world projects.
Make sure you don’t miss the upcoming articles, you can find me as @cortinico on Twitter .
Leave a comment